
ONBOARDING
Integrate AGENT AI CHAT BOT with Go High Level CRM to allow your business to leverage the power of conversational AI within your existing Go High Level workflows.
ONBOARDING
Personalise your chatbot experience by adding custom values specific to your business needs.
BUILDING YOUR BOT
1 - Connect to Your Account to AGENT AI Chat Bot with GoHighLevel
2 - Create an AGENT AI Chat Bot Workflow
3 - Activating YOUR Bot
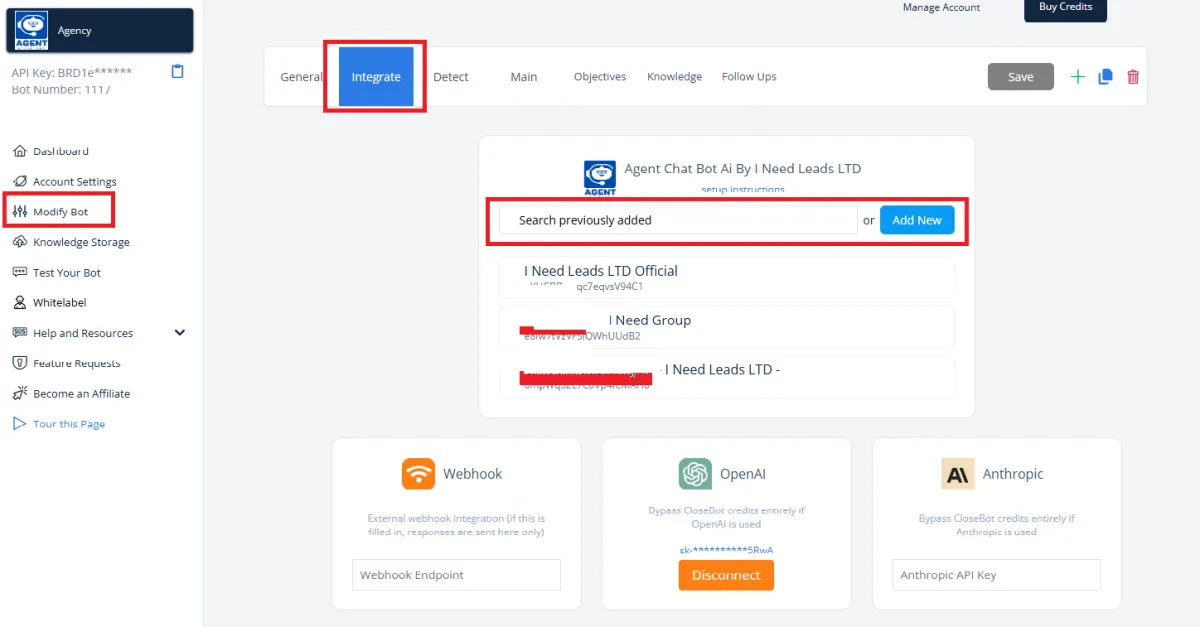
Step 1: Connect Your Account to AGENT AI Chat Bot with GoHighLevel
From your AGENT AI Chat Bot dashboard, navigate to your Modify Bot>Integrate and change to the bot that you want to get connected to. You'll see you are able to click to connect to an account or search to connect to an account you've already connected to in the past.
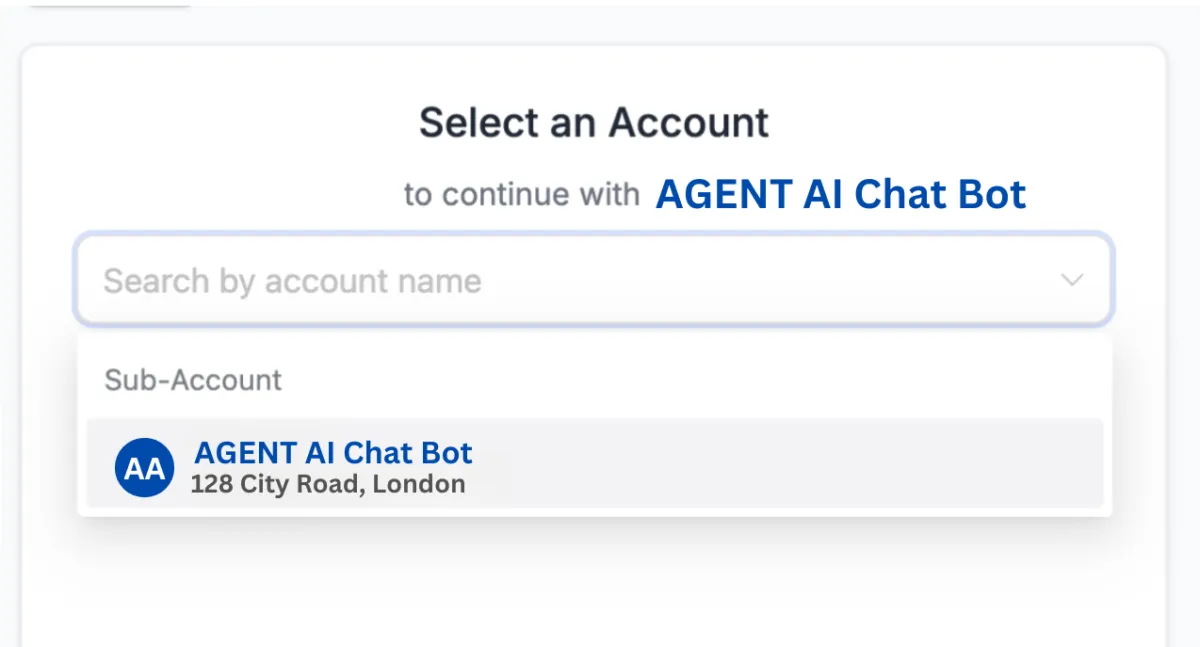
You must be logged into the sub-account that you would like to connect to within the same browser. If you are, clicking this will bring up another window where you will see those accounts that you can connect to. Select the sub-account that you would like this bot to connect to.
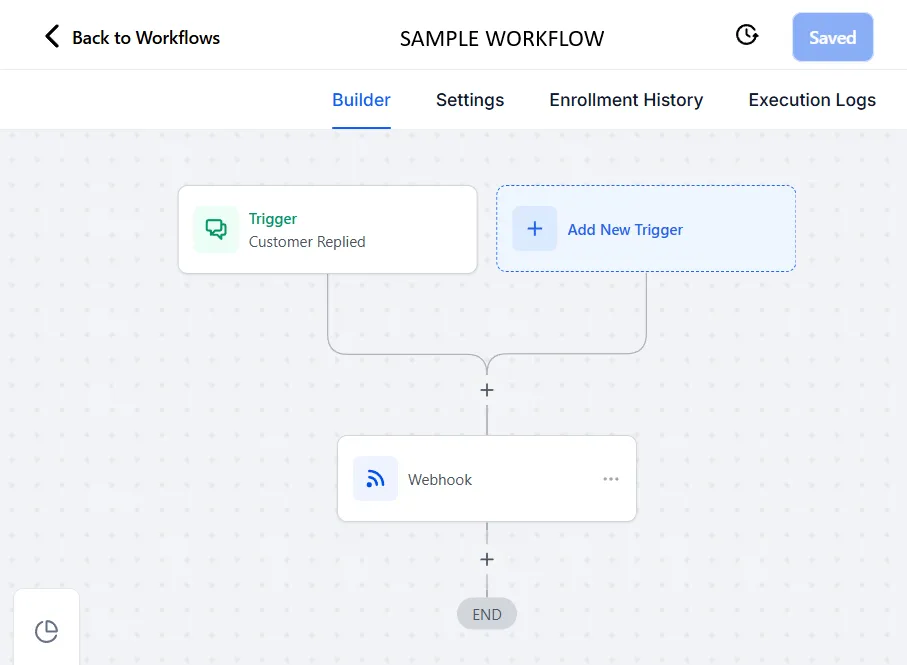
Step 2: Create an AGENT AI Chat Bot Workflow within your GoHighLevel account
AGENT's automations are made up of a single trigger and a single action.
Create a new workflow in your account as shown below.
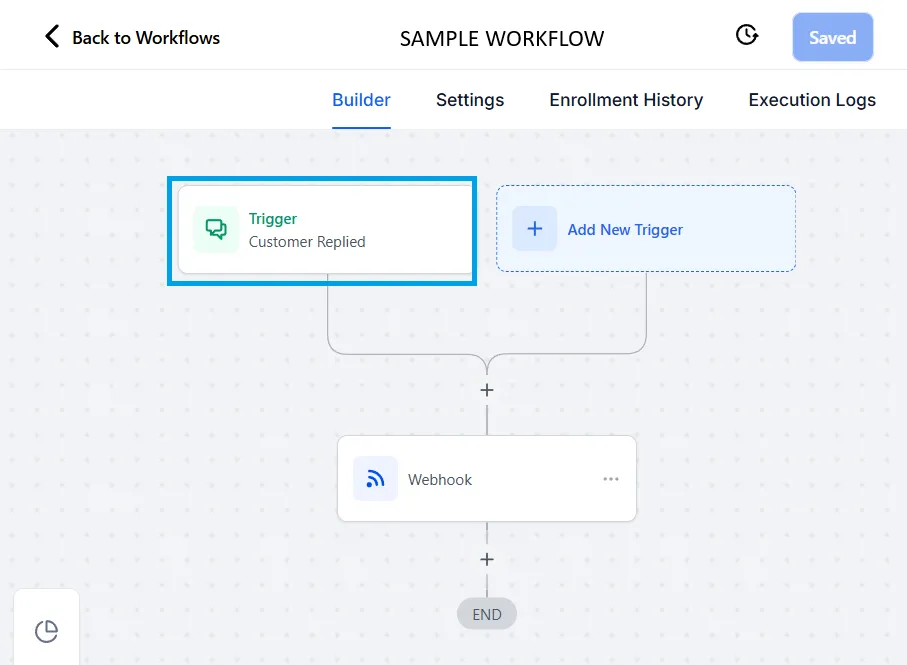
Trigger - Customer Replied
Click to Add New Trigger and add a Customer Replied trigger. This will activate the workflow any time a customer sends you a message on any channel.
Action - Webhook
Click to add a new action and add a Webhook action. Edit the webhook to point to the AGENT endpoint like this:
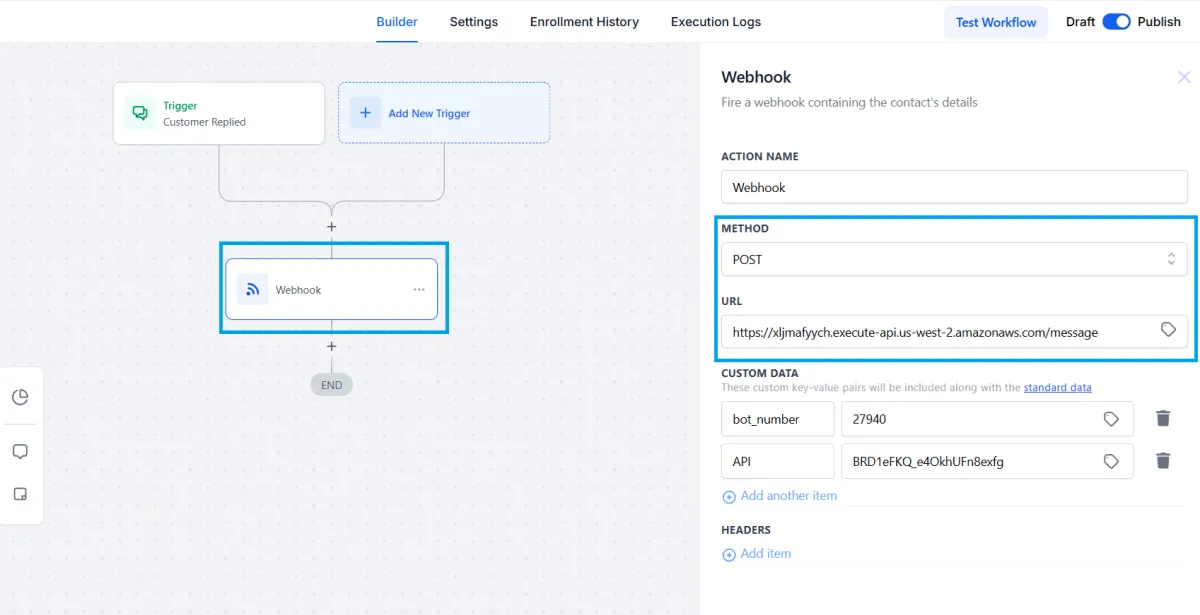
Here is that URL for you to copy/paste as shown above under METHOD>URL:
https://xljmafyych.execute-api.us-west-2.amazonaws.com/message
This action is what sends AGENT AI CHAT BOT the necessary information when it is triggered by a new message. 🤖 👏
Step 3: Activating Your Bot
AGENT's automations are made up of a single trigger and a single action.
Create a new workflow in your account as shown below.

NOTE:
By leveraging the power of custom values, you can transform your AGENT AI Chat Bot from a basic chatbot into a sophisticated and intelligent conversational AI that delivers exceptional customer experiences.
CUSTOM VALUES
Integrating AGENT with Go High Level involves using custom values to dynamically pass information from your CRM to AGENT.
Here's a step-by-step guide to help you understand the process:
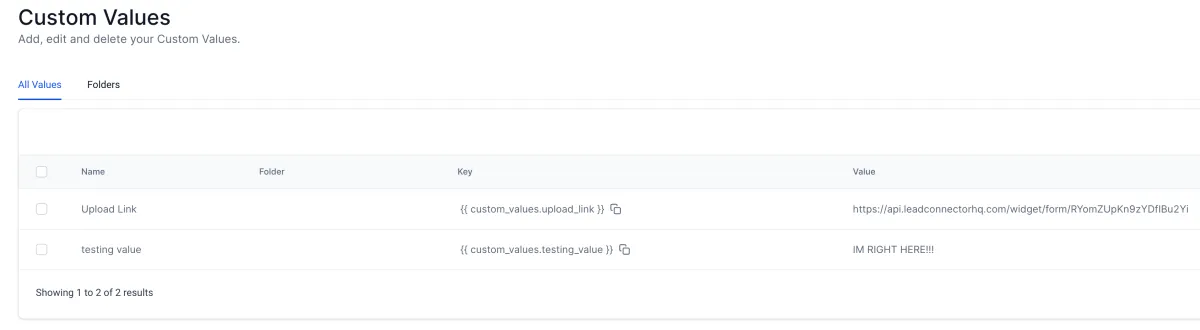
Find Your Custom Values and Custom Fields
You can find out how your variables are referenced by navigating to:
Settings ➡️ Custom Values or Custom Fields
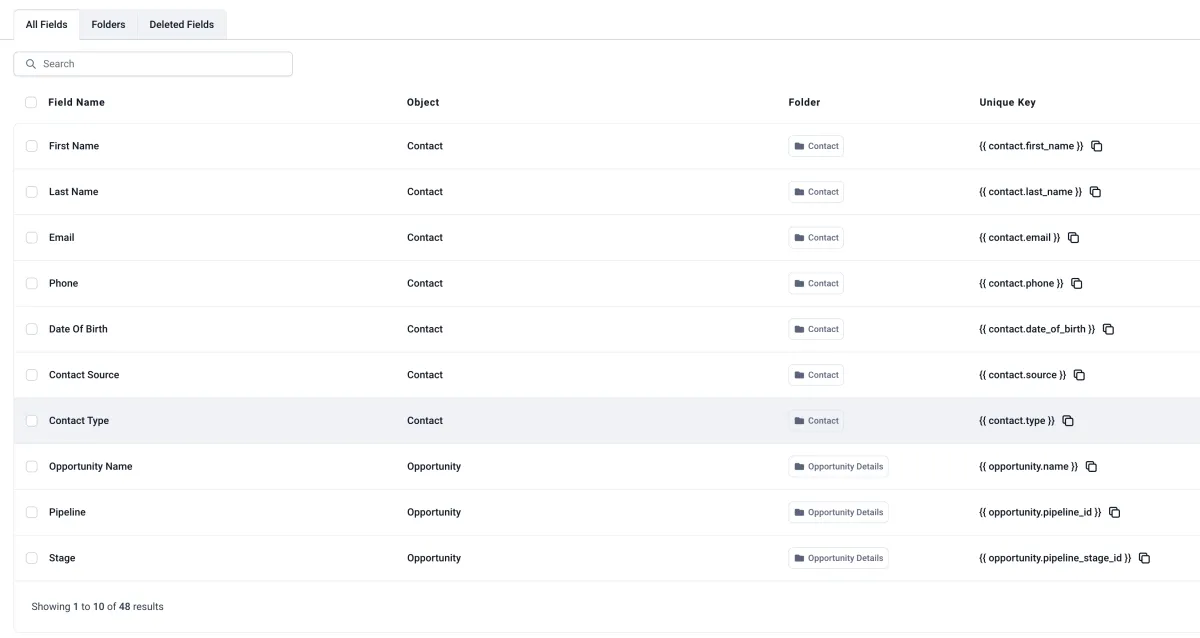
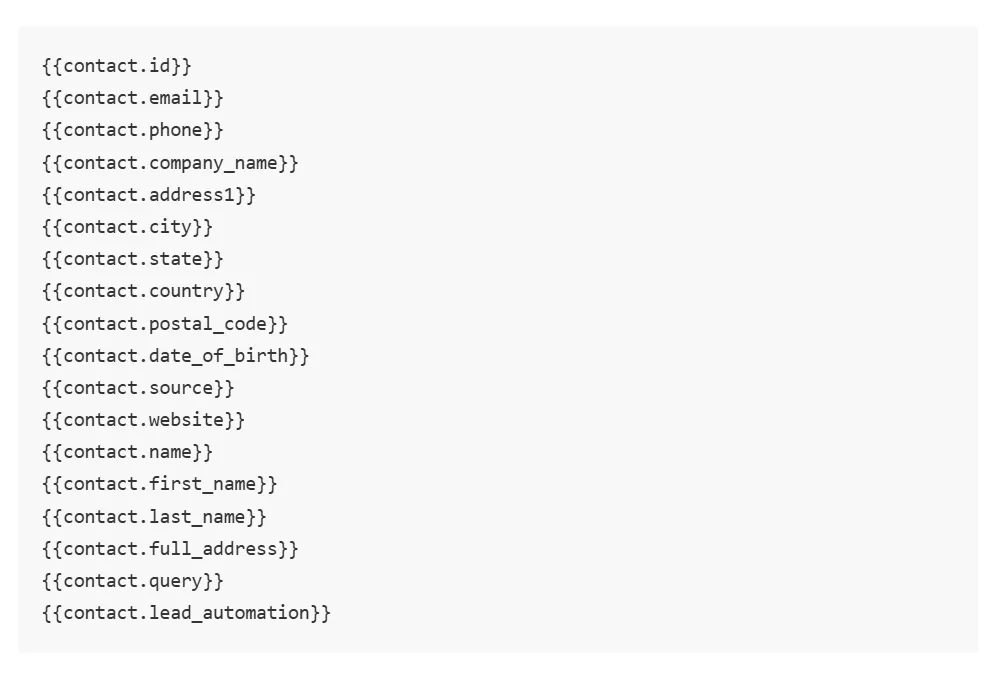
List of Standard Variables
Here is a list of all of the standard variables you can use in addition to all of your Custom Values and Custom Fields (which will vary by account)
CONTACT VARIABLES
These variables are pulled in from your contact-level. These are the standard fields. As discussed above, you can also reference your Contact Custom fields in addition to these fields.
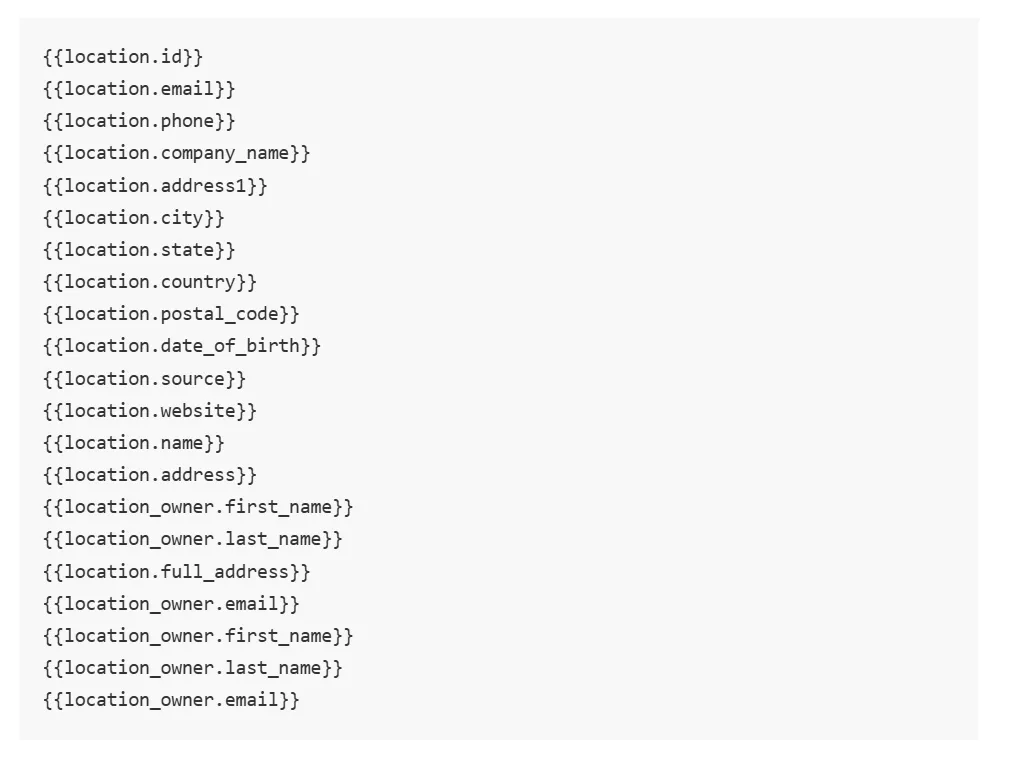
LOCATION VARIABLES
These variables are pulled in from your location-level. These are the standard fields.
Adding custom values to your CRM is crucial for setting up an effective AGENT AI Chat Bot. These values act as dynamic variables within the bot's logic, enabling personalized and context-aware interactions.
Why are custom values important?
Personalised Experiences: By incorporating custom values like , , or , the chatbot can address customers by name, recall past interactions, and tailor responses to their individual needs and preferences.
Enhanced Efficiency: Dynamically referencing customer data within the bot's responses streamlines interactions, reduces the need for repetitive data entry, and improves overall efficiency.
Improved Targeting: Custom values enable more precise customer segmentation and targeted messaging, allowing you to deliver the most relevant information and offers to each customer.
Data-Driven Insights: By analyzing custom values collected through chatbot interactions, you gain valuable insights into customer behavior, preferences, and needs, which can be used to further refine your marketing and customer service strategies.
Example: "Give Info" Objective
In the "Give Info" objective, you can use the following:
Objective: "Give the upload link"Main Prompt: "Here is your upload link: "
This demonstrates how custom values like and (from your custom values) can be seamlessly integrated into the bot's responses, creating a more personalised and efficient customer experience.
💡You can also check out our blog here about adding custom variables into your AGENT AI Chat Bot: Using CRM Variables in Bot Settings
NOTE:
By leveraging the power of custom values, you can transform your AGENT AI Chat Bot from a basic chatbot into a sophisticated and intelligent conversational AI that delivers exceptional customer experiences.


NAVIGATION
RESOURCES
CONTACT
FOLLOW US
© Copyright 2023. AGENT by I Need Leads Ltd.
All Rights Reserved.
NAVIGATION
RESOURCES
CONTACT
FOLLOW US
© Copyright 2023. AGENT by I Need Leads Ltd. All Rights Reserved.
Elevating Engagement, Empowering Growth with AGENT Ai Chat Bot
by I NEED LEADS LTD.
NAVIGATION

