
ONBOARDING
You've chosen the perfect plan for your needs! Whether you're starting with 1 bot, scaling with 3, going all-in with Unlimited, or just exploring with our 7-day trial, the next crucial step is setting up your CRM. Your bot and CRM work hand-in-hand, so let's get them connected! In this step, we will cover:
CRM Log-in
Accessing Your CRM Dashboard
Adding Users/Team Members in Your CRM
Updating Your Business Profile
CRM SET-UP
CRM LOG-IN AND DASHBOARD
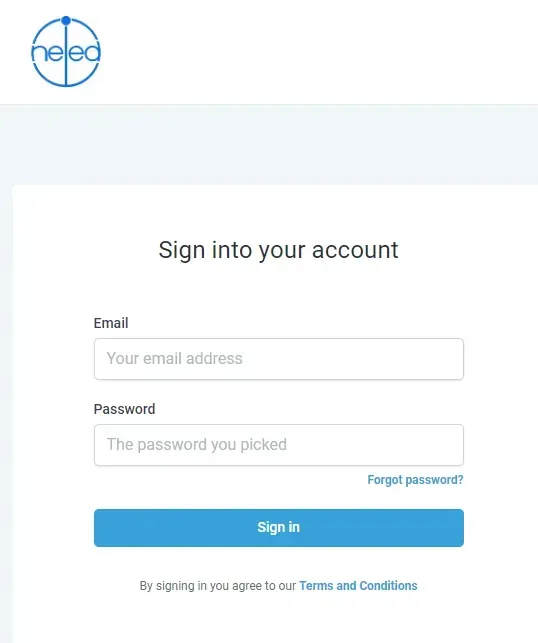
CRM Account Creation - Login with your email and designated password to access your CRM
Account Recovery Options: In case you forgot your password or simply want to change it, a "Forgot Password" feature is prominently placed on the login page. This option leads you through a secure process to reset their password, requiring only the email address associated with their account.
🖱️LOG-IN link: https://login.theineedgroup.co.uk
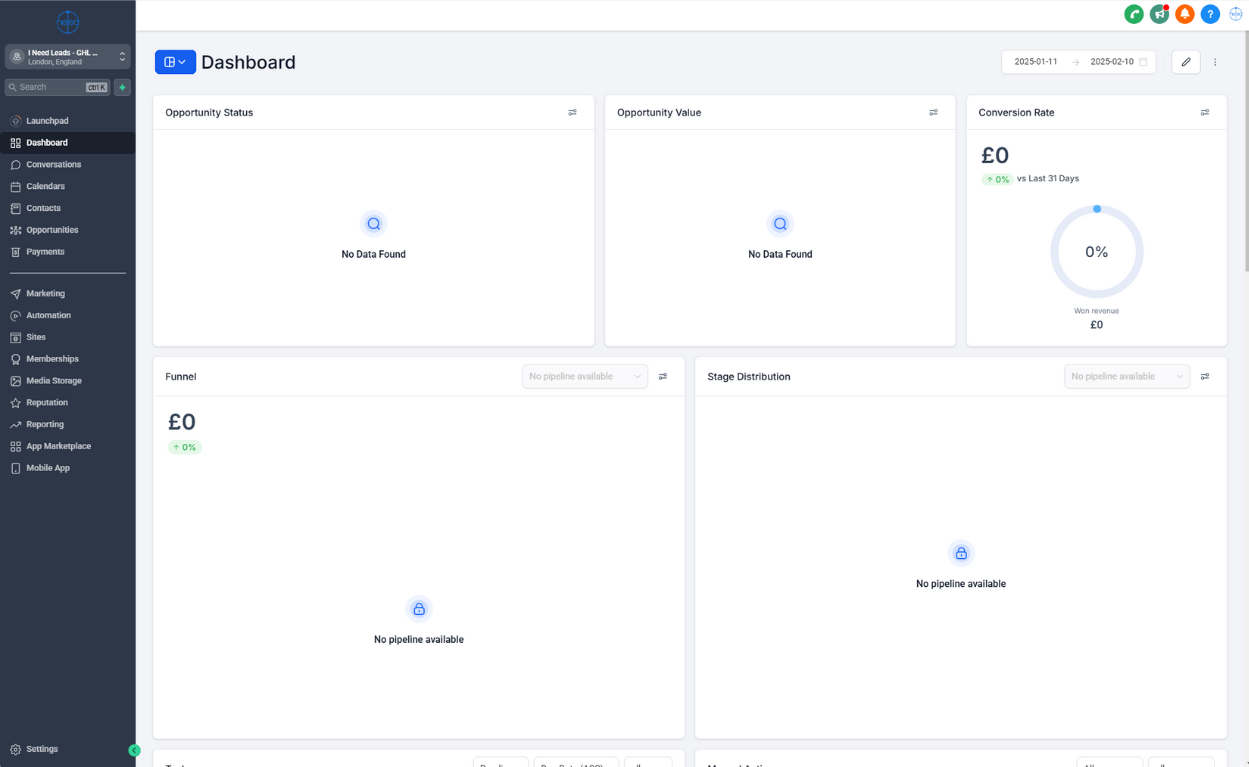
ACESSING YOUR CRM DASHBOARD:
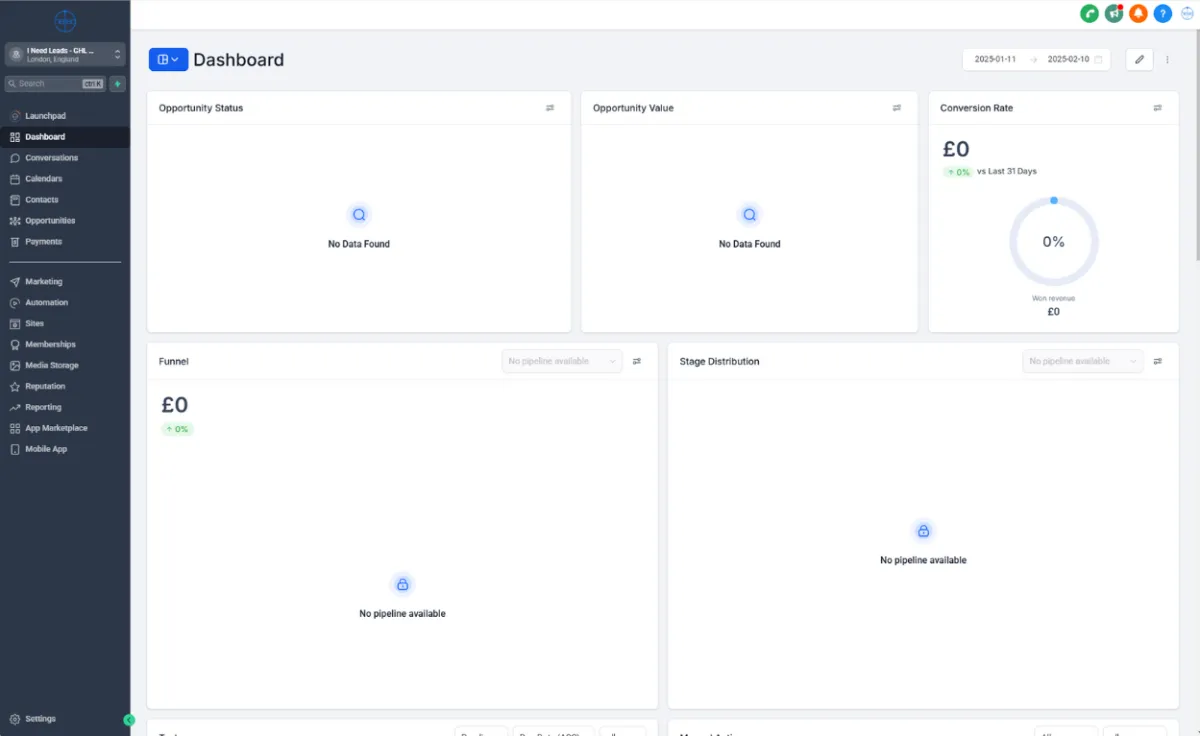
After successful log-in, you will be directed to your CRM dashboard as shown below. This centralised hub shows an overview of the the CRM's features and functionalities.
ADDING USERS / TEAM MEMBERS:
To quickly add users to your CRM, go to >Launchpad then at the bottom, go to >Quickly add one or more team members.
Add your team member's email and press enter to add more.
Alternatively, you can download the mobile app (as shown below) and add your team members from there.

UPDATING YOUR BUSINESS PROFILE
Your Business Profile in your sub-account settings is where you configure company-wide data and settings.
- Click the SETTINGS navigation item on the left side of your screen.
- In SETTINGS, the BUSINESS PROFILE will be the first navigation button in the settings menu on the left-hand side of your screen.
- The Business Profile is also the first page of settings by default, so once you click the SETTINGS button, you will automatically see the BUSINESS PROFILE.
IMPORTANT SECTIONS TO FILL IN FOR YOUR BUSINESS PROFILE
General Information
Accurate General Information, including your Branded Domain, is crucial. This ensures correct business information is used in Custom Fields and Trigger Links throughout your sub-account.
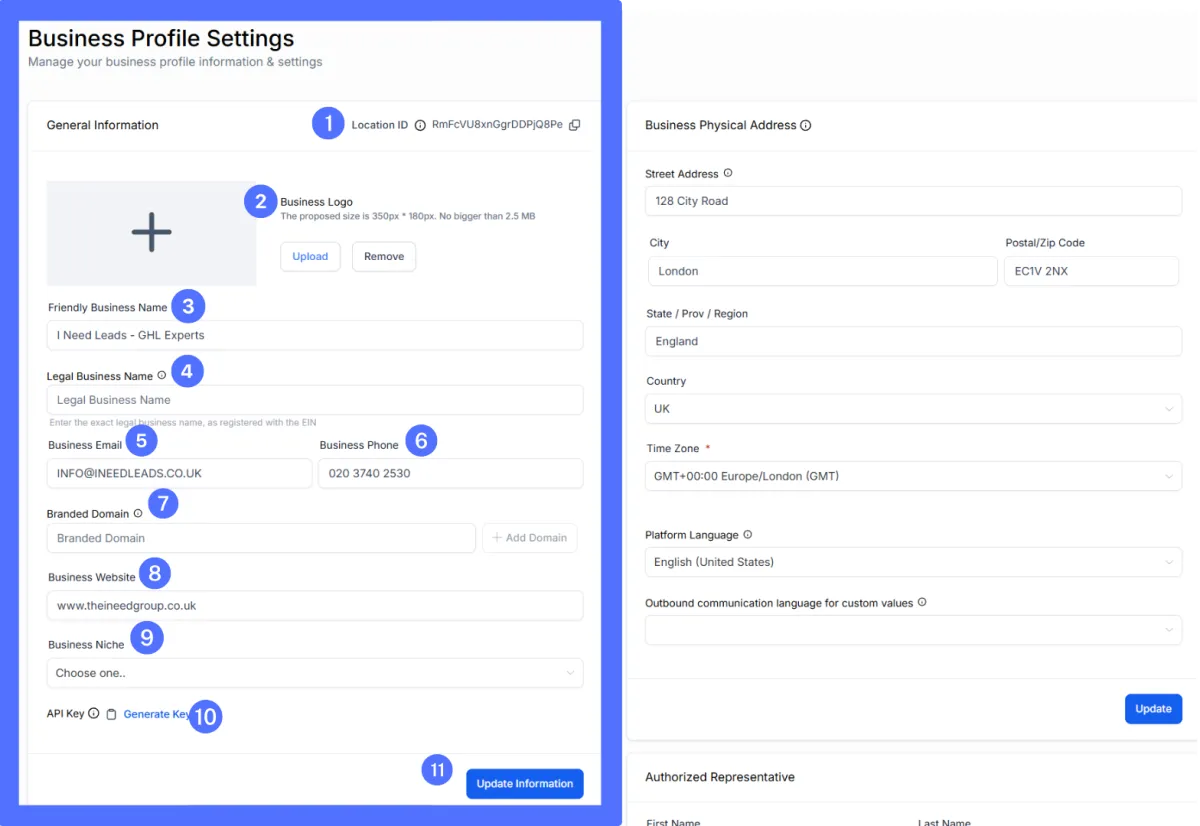

1. Location ID: Provide this unique ID to support for troubleshooting
2. Business Logo: Upload your logo. It appears in your Agency Dashboard and can be used in invoices, emails, and messaging (e.g., {{location.logo_url}}).
3. Friendly Business Name: This name is used in messaging, workflows, etc. (e.g., {{location.name}}).
4. Legal Business Name: Enter the exact legal business name for compliance.
5. Business Email: Used in messages, emails, and workflows (e.g., {{location.email}}).
6. Business Phone: Used in messages, emails, and workflows (e.g., {{location.phone}}).
NOTE: For calling/messaging, configure your LC phone number and then copy/paste it here. This needs to be a mobile number.
7. Branded Domain: Connect a subdomain for custom URLs for Trigger Links, Calendars, etc.
8. Business Website: Used in messages, emails, and workflows (e.g., {{location.website}}).
9. Business Niche: Select the most relevant niche for your business on the dropdown options.
10. API Key: Used for integrations with your AGENT AI Chat Bot and other apps.
11. Update Information: Save your changes!
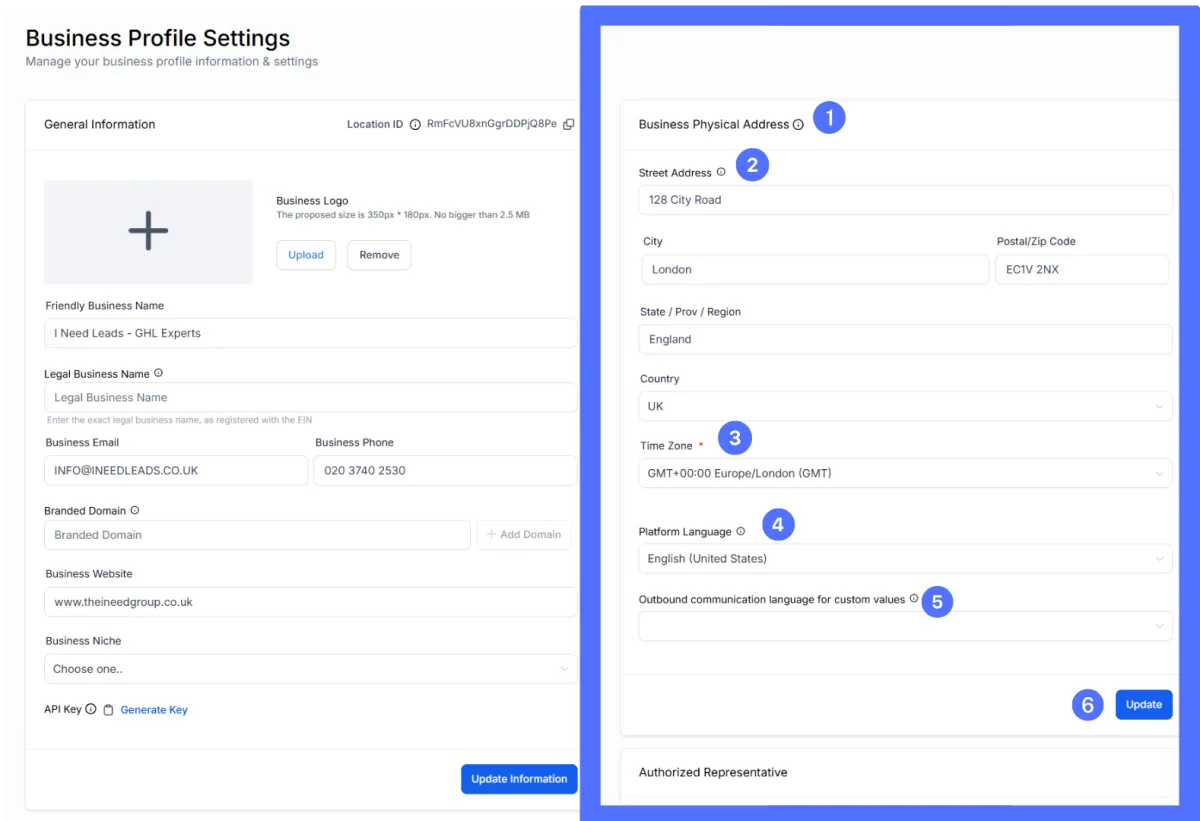
1. Business Physical Address: This information not only can be used when verifying your business for certain features that may need verification, but it can also be used when adding Custom Fields and Custom Values in messages, social posts, email campaigns, websites, and even funnels.
2. Street Address: Enter the business address as shown in your company registration.
3. Time Zone: Automated events within campaigns work with this field to determine when to send. You may be able to override this default time zone setting depending on the feature being used, such as workflows or email campaigns.
4. Platform Language: Controls what language your sub-account displays in.
5. Outbound Communication Language Custom Values: When you are sending Custom Fields and Custom Values in messages, your CRM needs to know how you want that information to be displayed to the person or persons receiving the message.
6. Update Information: Save your changes!
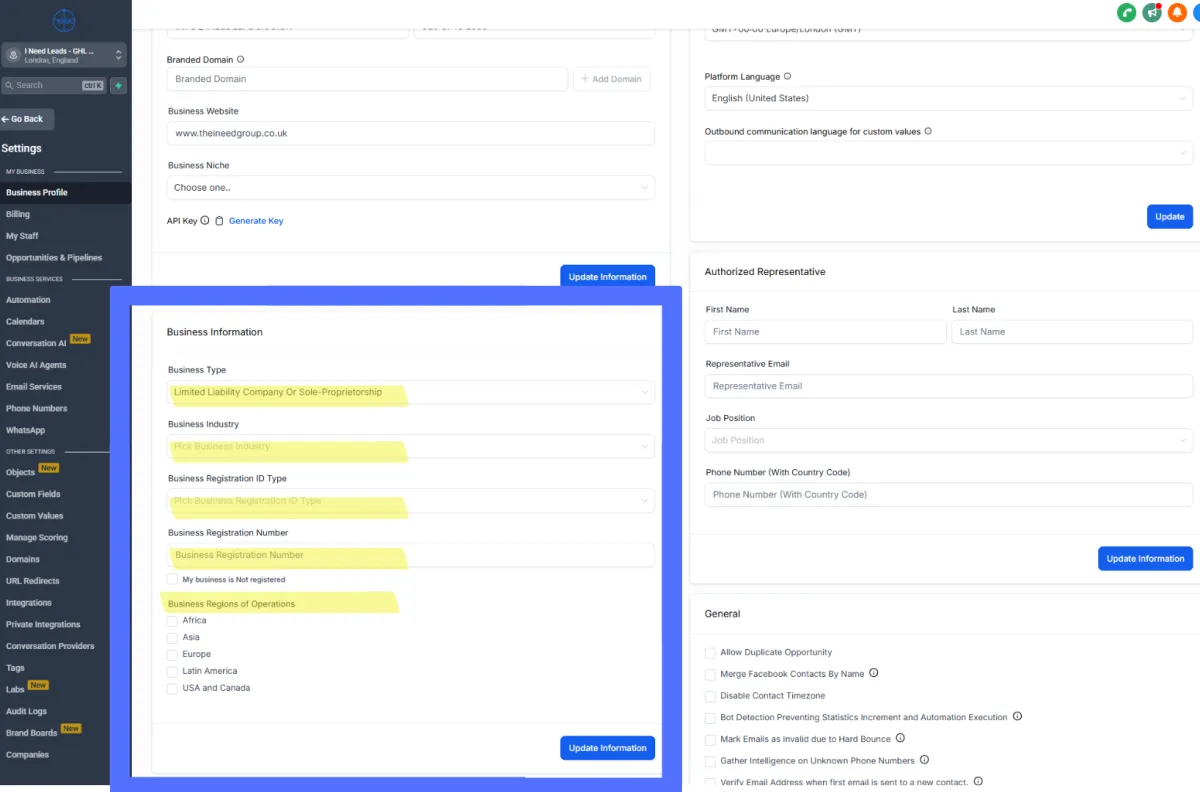
Business Information
1. Business Type: Select your business structure (Co-operative, Corporation, LLC/Sole-Proprietorship, Non-profit, Partnership).
2. Business Industry: Choose the industry that best represents your target market.
3. Registration Type: Select your business registration type (e.g., EIN in the US).
4. Registration Number: Enter your registration number.
5. Regions of Operation: Select the regions where you primarily operate. You can select multiple regions.
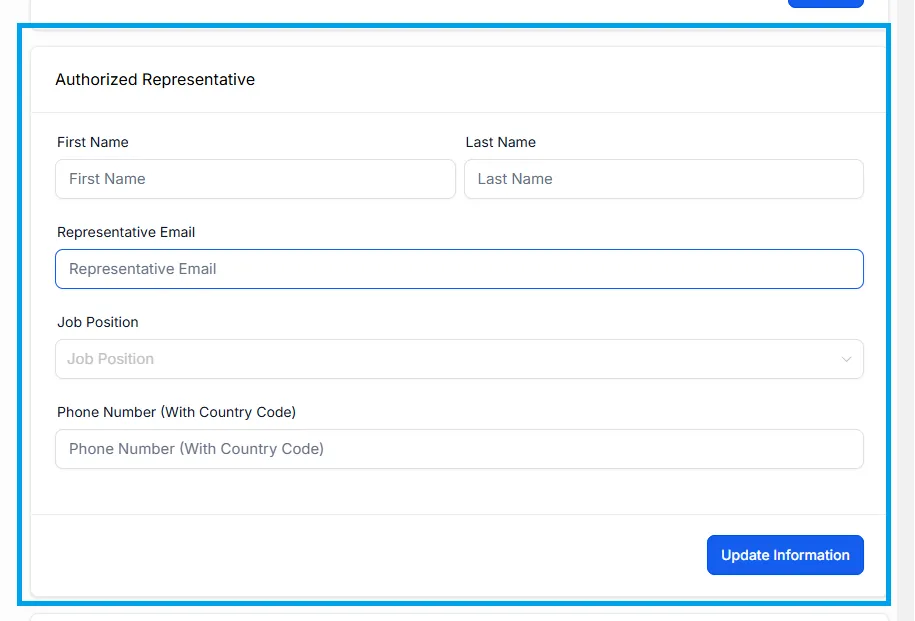
Authorized Representative: If your business has an authorized representative, please add their information here. If you are the authorized representative, please add your own information here.
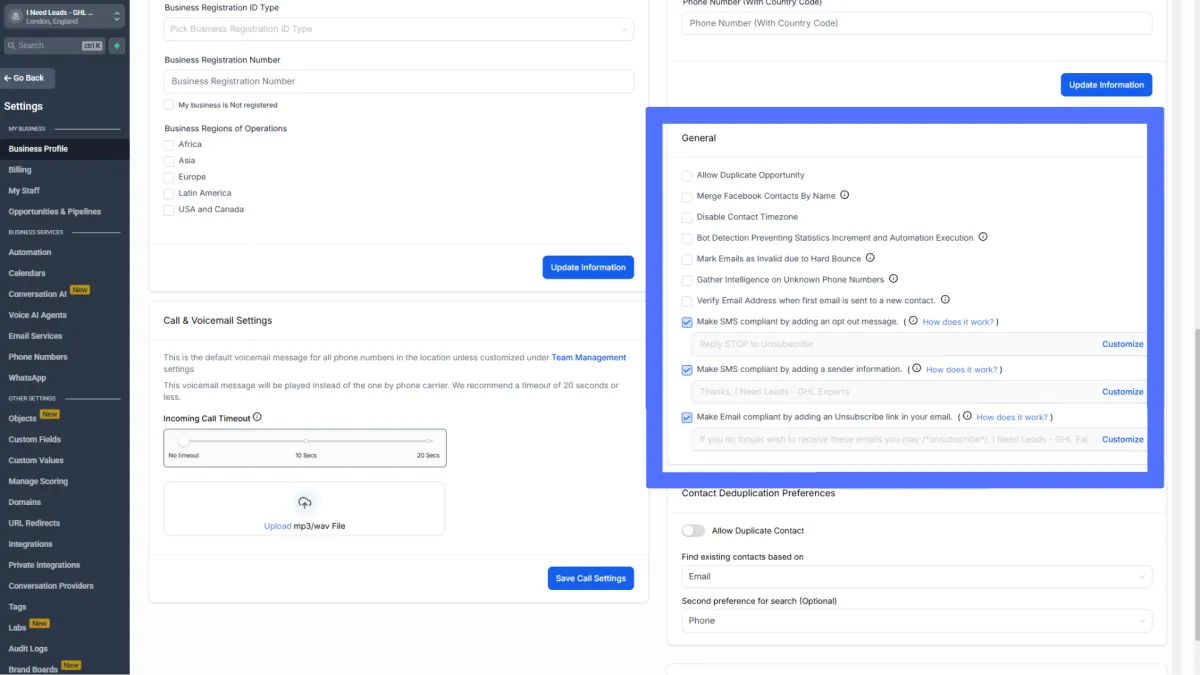
GENERAL
These settings significantly impact your sub-account. Review them carefully.
Allow Duplicate Opportunities: Enable to create multiple opportunities in the same pipeline (instead of moving opportunities between stages). Useful in specific scenarios.
Merge Facebook Contacts by Name: Merge new Facebook Messenger contacts with existing contacts having the same name.
Disable Contact Timezone: Use only the sub-account's timezone, ignoring contact timezones for scheduling. Use with caution.
Mark Emails as Unverified due to Hard Bounce: Automatically mark hard-bounced email addresses as unverified, preventing future sends and saving costs. Workflow email actions are skipped for unverified addresses.
Validate Phone Numbers on First SMS: Validate new phone numbers before sending the first SMS. Invalid numbers prevent SMS delivery until validated.
Verify Email Address on First Email: Validate new email addresses before sending the first email. Unverified addresses prevent email delivery until validated.
SMS Compliance (Opt-Out & Sender Info): Pre-configured and strongly recommended to remain enabled. See the LC phone system documentation for customization.
Email Compliance (Unsubscribe Link): Pre-configured and strongly recommended to remain enabled.
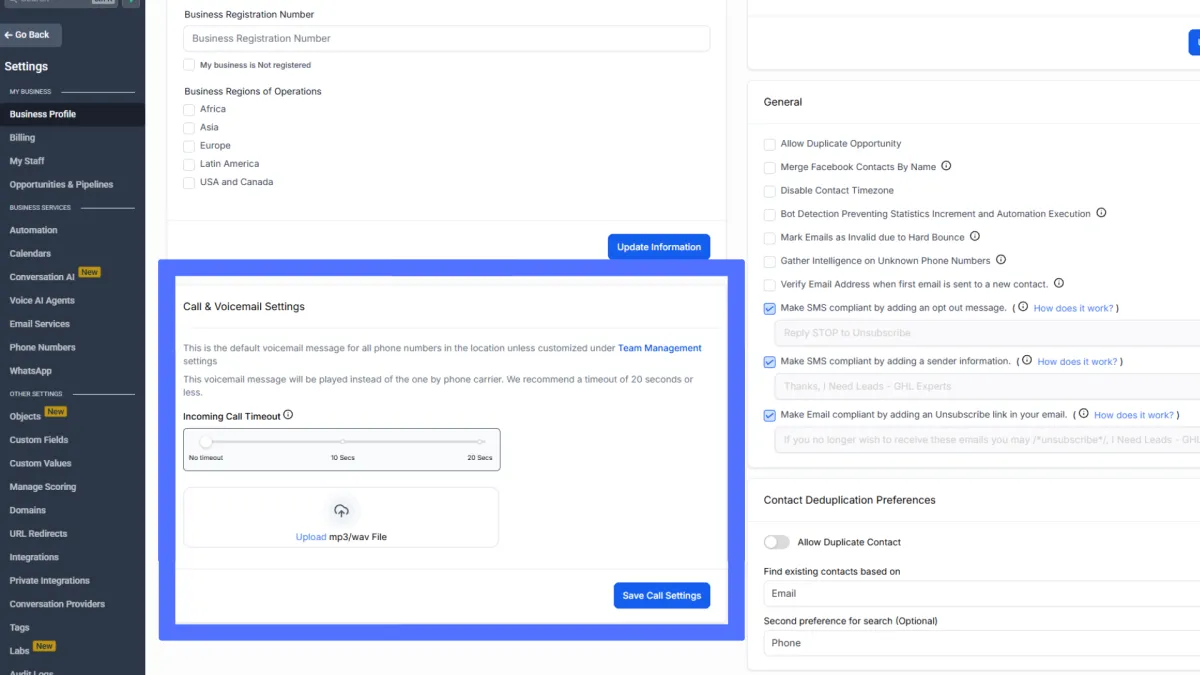
Call & Voicemail Settings
These sub-account voicemail settings apply to all calls unless overridden by individual team member voicemail settings.
Voicemail files must be in MP3 or WAV format.
The "Incoming Call Timeout" determines how long before a call goes to voicemail. We recommend 10-20 seconds, but shorter timeouts (under 10 seconds) may be preferable to avoid callers hanging up before reaching voicemail.
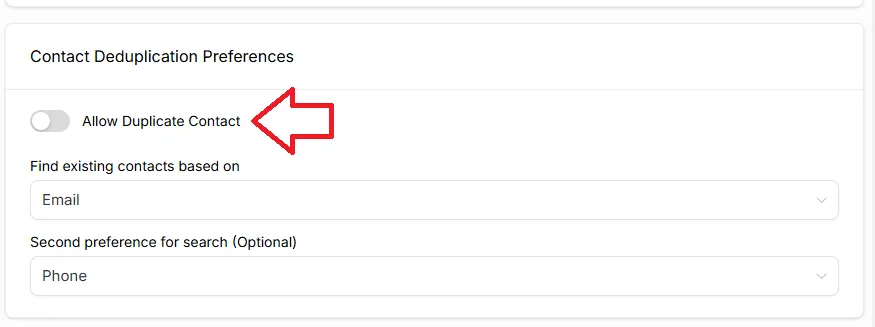
Contact Deduplication Preferences
This setting allows you to control how your sub-account treats duplicate contacts. If you want to "Allow Duplicate Contacts", you would toggle this setting into the ON position. If you DO NOT want duplicate contacts, you would toggle this setting to the OFF position.

Missed Call Text Back
Never miss a connection! Our missed call text back feature automatically sends an SMS to callers who weren't able to reach your team. Easily configure this in your Business Profile settings, customizing the message with personalized details using Custom Fields and Values.

NOTE:
Before integrating AGENT AI Chat Bot, it's crucial to have a robust and well-configured CRM system in place. This foundational step ensures seamless data flow, accurate customer information, and efficient workflow management, all of which are essential for successful chatbot integration and optimal customer service.
I Need Leads CRM log-in
CRM SET-UP
CRM LOG-IN AND DASHBOARD
Log-in credentials for your CRM are established during the initial account setup.
CRM Account Creation - Login with your email and designated password to access your CRM
Account Recovery Options: In case you forgot your password or simply want to change it, a "Forgot Password" feature is prominently placed on the login page. This option leads you through a secure process to reset their password, requiring only the email address associated with their account.
🖱️LOG-IN link: https://login.theineedgroup.co.uk
ACESSING YOUR CRM DASHBOARD:
After successful log-in, you will be directed to your CRM dashboard as shown below. This centralised hub shows an overview of the the CRM's features and functionalities.
ADDING USERS / TEAM MEMBERS:
To quickly add users to your CRM, go to >Launchpad then at the bottom, go to >Quickly add one or more team members.
Add your team member's email and press enter to add more.
Alternatively, you can download the mobile app (as shown below) and add your team members from there.
UPDATING YOUR BUSINESS PROFILE
Your Business Profile in your sub-account settings is where you configure company-wide data and settings.
- Click the SETTINGS navigation item on the left side of your screen.
- In SETTINGS, the BUSINESS PROFILE will be the first navigation button in the settings menu on the left-hand side of your screen.
- The Business Profile is also the first page of settings by default, so once you click the SETTINGS button, you will automatically see the BUSINESS PROFILE.
IMPORTANT SECTIONS TO FILL IN FOR YOUR BUSINESS PROFILE
General Information
Accurate General Information, including your Branded Domain, is crucial. This ensures correct business information is used in Custom Fields and Trigger Links throughout your sub-account.
1. Location ID: Provide this unique ID to support for troubleshooting
2. Business Logo: Upload your logo. It appears in your Agency Dashboard and can be used in invoices, emails, and messaging (e.g., {{location.logo_url}}).
3. Friendly Business Name: This name is used in messaging, workflows, etc. (e.g., {{location.name}}).
4. Legal Business Name: Enter the exact legal business name for compliance.
5. Business Email: Used in messages, emails, and workflows (e.g., {{location.email}}).
6. Business Phone: Used in messages, emails, and workflows (e.g., {{location.phone}}).
NOTE: For calling/messaging, configure your LC phone number and then copy/paste it here. This needs to be a mobile number.
7. Branded Domain: Connect a subdomain for custom URLs for Trigger Links, Calendars, etc.
8. Business Website: Used in messages, emails, and workflows (e.g., {{location.website}}).
9. Business Niche: Select the most relevant niche for your business on the dropdown options.
10. API Key: Used for integrations with your AGENT AI Chat Bot and other apps.
11. Update Information: Save your changes!
Missed Call Text Back
Never miss a connection! Our missed call text back feature automatically sends an SMS to callers who weren't able to reach your team. Easily configure this in your Business Profile settings, customizing the message with personalized details using Custom Fields and Values.
NOTE:
Before integrating AGENT AI Chat Bot, it's crucial to have a robust and well-configured CRM system in place. This foundational step ensures seamless data flow, accurate customer information, and efficient workflow management, all of which are essential for successful chatbot integration and optimal customer service.


NAVIGATION
RESOURCES
CONTACT
FOLLOW US
© Copyright 2023. AGENT by I Need Leads Ltd.
All Rights Reserved.
NAVIGATION
RESOURCES
CONTACT
FOLLOW US
© Copyright 2023. AGENT by I Need Leads Ltd. All Rights Reserved.
Elevating Engagement, Empowering Growth with AGENT Ai Chat Bot
by I NEED LEADS LTD.
NAVIGATION

